Creating an Art Tile Fireplace
A bland and damaged surround is remade with a period tile installation—and it becomes a stylish focal point.
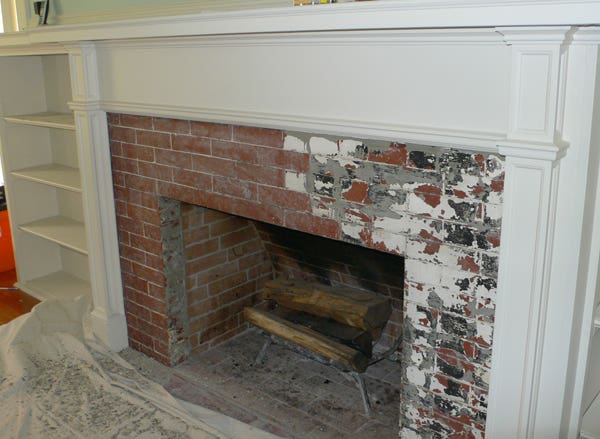
The original fireplace surround in my 1910 Colonial Revival house was a mess. Not only had it been covered with faux-stone tiles, but even the underlying brick had a wide section of cement running through the center of the hearth. Not thrilled with the brick and faced with the prospect of matching it for repairs, I decided to install a decorative surround using art tile. Although the exterior style of the house is Colonial Revival, the staircase, original doors, and trim all lean towards Arts & Crafts, at its height of popularity in 1910. I played up these elements with the tile, and created a focal point for the living room.
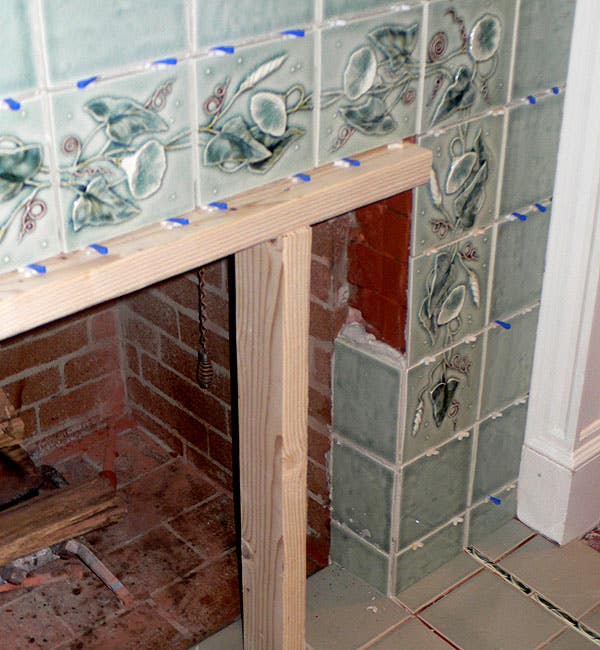
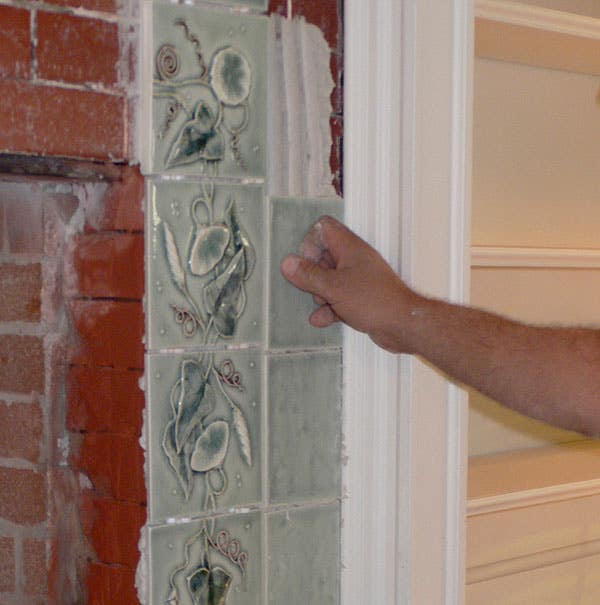
After consultation with Judy Hodges, an interior designer and the owner of a tile store, I chose Pratt & Larson’s ‘Watercolor’ series. The decos in the design featured a trailing morning-glory vine, complete with corner pieces that suggested it be “draped” over the firebox opening as if it had grown there. The next step was to take my sketch and dimensions and draw it to scale. Every fireplace, old or new, will vary in its dimensions. It’s important to leave a little leeway for the installer. But “if it works mathematically, it works aesthetically,” as Judy says.
Since the tiles I had chosen for the surround are not recommended for floor use, Judy suggested tiling the hearth with a more robust tile. The magpie in me wanted a little sparkle there, too, so Judy incorporated a narrow ½" x 8" leaf-patterned border with a coordinating glaze into the overall design.
Likening the process of setting tile to that of finish carpentry, Judy referred me to an old-school tile-setter, Bill Muscarella. Before he could begin, though, Bill had to chisel and scrape away the built-up layers of paint, cement, and sealer on the brick. He used a basic paint stripper to remove the residue, then scuffed up the stripped brick with 60-grit sandpaper. The first complication came with Bill’s detailed measurements of the firebox opening, which revealed different widths at any given point—a more complicated calculus than my naïve, once-across-the-top measurement. In addition, the settling of the house over the decades had caused the surrounding woodwork to shift, further altering the dimensions of the surround.
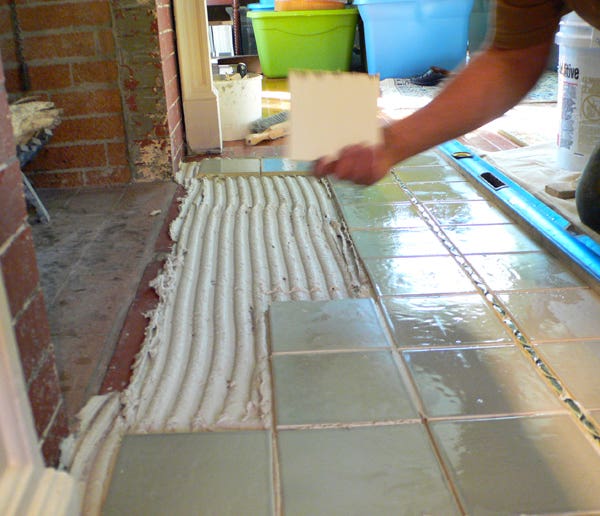
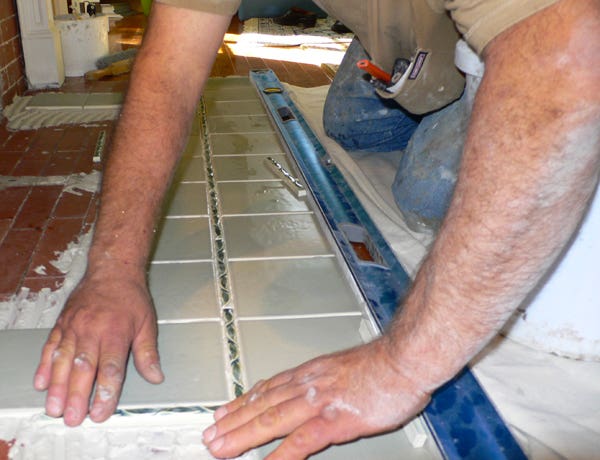
Besides the variables of the uneven firebox and shifting mantelpiece, each hand-molded tile varies slightly in size. To accommodate all these subtle differences, Bill continuously manipulates the course of a run by opening and closing the grout joint in order to create visually straight lines between tiles. “You’ve got to play around with them,” he says. “If you open the tiles up, you can see how close you can make them without losing the straightness of the line. What you do is space the differences [with thin-set mortar]. Usually you can hide just about anything that way.”
Watching Muscarella work is like watching a hand ballet. He gently feels, pats, and wiggles each tile, producing bulges of excess “mud” that he removes with a finger. His face and clothes are soon plastered with drying mortar. When I comment on this, he says the mess is a by-product of a job done well. “You watch those shows on HGTV...I never can figure out how they lay tile without getting dirty.”
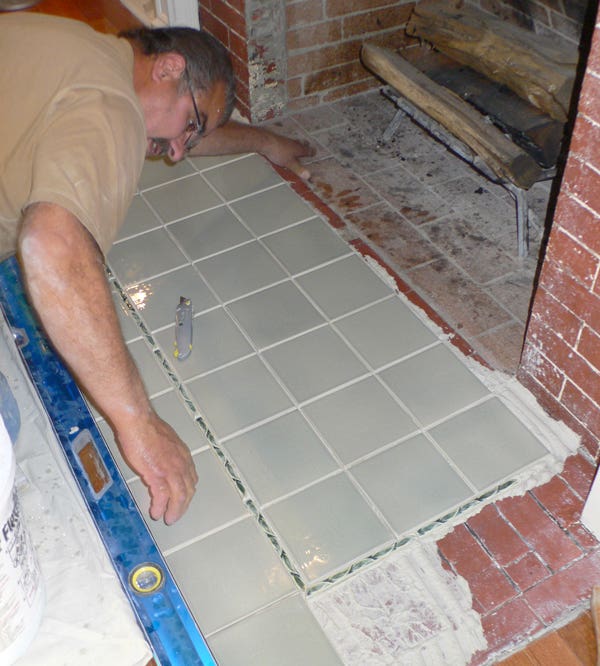
Bill began with the hearth, squaring it on the center, then laying tile from the outside in. Laying tile requires a good eye, but also speed—a stumbling block for many do-it-yourselfers. “You have about half an hour before the [mortar] sets up,” Bill says. “Most [amateurs] don’t get the tile in fast enough.” Even with spacers, the setting process can cause tiles to “walk.” After the hearth was tiled, work moved to the surround. Bill pointed out that the legs (or sides) of the firebox were just a bit too wide to cover with two tiles laid side by side. To avoid laying an extra partial tile, Bill drew a 1” line along the vertical edge of the firebox, then chipped out the brick at an angle on either side. This not only made it possible to cover the full width of the legs with one deco and one field tile, but also produced enough space to miter the tiles of the surround to those of the return.
Bill worked from the bottom up, and the inside out, all the time wiggling tiles. When it was time to lay the horizontal course, he built a simple scaffold to provide support for the tiles while they set. The precious decorative tiles went gently into place in mere seconds. After the tiles were fully set (16 to 24 hours later), Bill applied the finish grout. A couple of days later, I gave the completed surround two coats of sealer to protect it from ash. In the end, was the fastidious Mr. Muscarella satisfied with his work? “It turned out good,” he says. “I’m enjoying the pattern because it’s earthy. Anything that’s organic, you don’t get tired of.”
Resources
• Tile design by Judy Hodges, The Tile Room, Rochester, NY: (585) 473-1020, thetileroom.com
• Surround tile pattern ‘WaterColors’ (W7 field; Morning Glory BB decos). Hearth tiles are ‘Craftsman Matte’ (C25;) with ‘WaterColors’ ½" x 8" strip (BB-CLEA). All from Pratt & Larson, Portland, OR: prattandlarson.com. Purchased through The Tile Room.
• Tile setter Muscarella’s Ceramic Tile, W. Seneca, NY: (716) 674-8024
Catherine Lundie is a happily incurable old house addict. Lundie is the editor of Restless Spirits: Ghost Stories by American Women, 1872–1926. She holds a PhD in English with a specialization in 19th Century American culture and literature.